Linux Review
Linux Review Notes
Updated:
阅读中文版
1. Linux Review
0. Network Configuration
1. ip addr to view IP
2. Xshell remote connection
Xshell and XFTP download address: https://www.xshell.com/zh/free-for-home-school/
Virtual machine download address: https://www.vmware.com
CentOS official website download Official website: https://www.centos.org/
1). Check your network segment and gateway
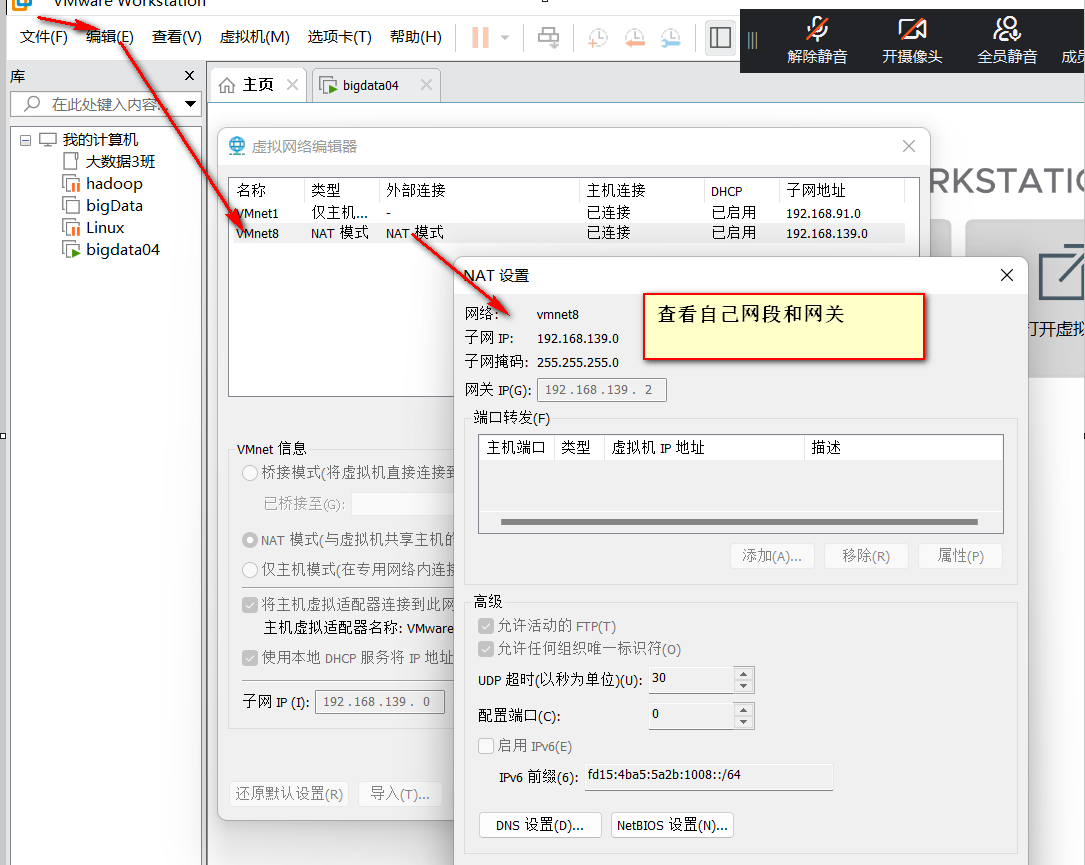
2). Modify the configuration file
vi /etc/sysconfig/network-scripts/ifcfg-ens33#Add an IP address in the same network segment as yours. The instructor's network segment is 192.168.139.
IPADDR=192.168.139.10
#Add gateway
GATEWAY=192.168.139.2
#Add domain name resolver
DNS1=192.168.139.2
#Change BOOTPROTO="dhcp" to static
BOOTPROTO="static"
#Change ONBOOT="yes"
ONBOOT="yes" #Whether the network interface is enabled at system startup (yes/no)3). Restart the network
service network restart
4). Disable the firewall
(1) Check the status of the firewall service
systemctl status firewalld
(2) Stop the firewall service
systemctl stop firewalld
(3) Disable the firewall service
Disable the firewall automatically at boot
systemctl disable firewalld.service
yum install -y epel-release
yum install -y psmisc nc net-tools rsync vim lrzsz ntp libzstd openssl-static tree iotop git zip unzip
-- Set a fixed IP address, restart the network
-- Connect to Linux using a shell tool
-- Disable the firewall
-- Install necessary software via yum
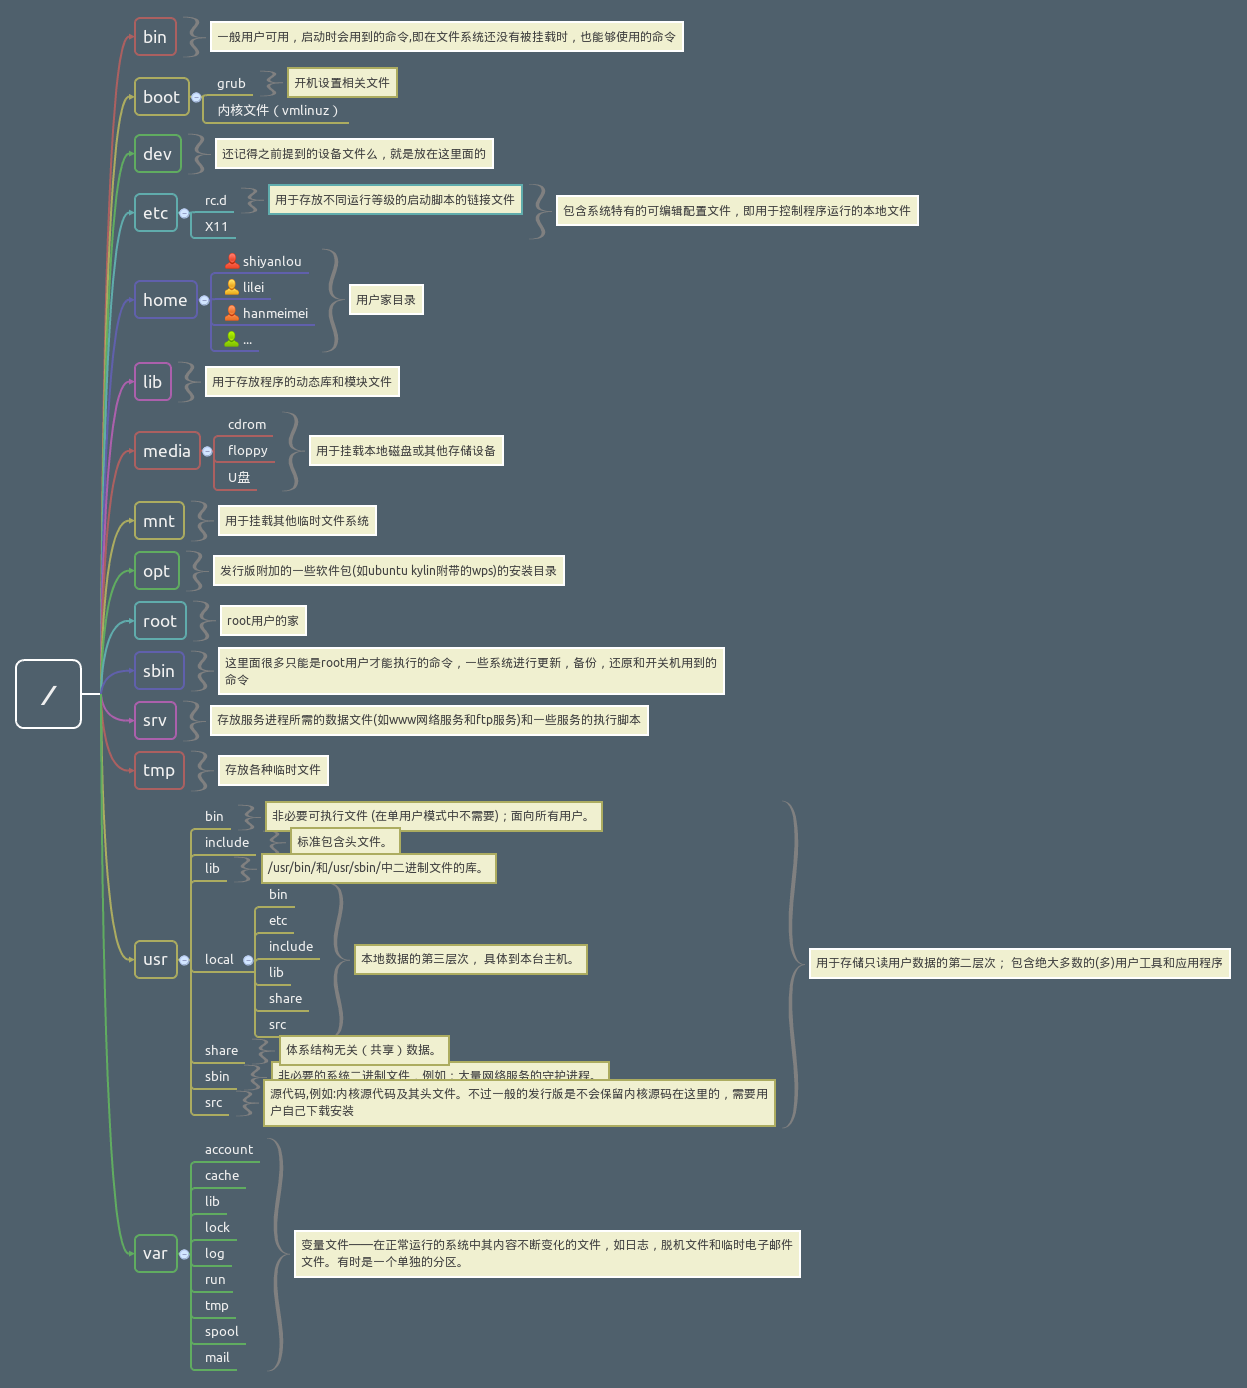
1. Linux Directory Structure
-
/: Root directory -
boot: bootstrap, where the system starts -
bin: binary commands (executable files), available to general users, commands used during startup -
sbin: system binary, mostly commands only usable by root -
dev: device files -
etc: Configuration files -
lib: library, program dynamic link libraries -
media: Used for mounting local disks or other storage devices -
mnt: mount, used to mount other temporary file systems -
opt: optional, installation directory for optional software packages -
srv: service, data files required by service processes and some service execution scripts -
tmp: temporary, stores various temporary files -
root: The home directory of the superuser -
home: The home directories of regular users are created under home, e.g., /home/zhengwei is zhengwei's home -
usr: user shared resource or unix software resource, contains the vast majority of user tools and applications -
var: variable, stores constantly changing files
2. VI/VIM Editor
VI is the most common text editor in Unix and Unix-like operating systems.
The VIM editor is a more powerful text editor developed from VI. It can actively distinguish syntax correctness through font colors, making it convenient for programming. VIM is fully compatible with the VI editor.
2.1 General Mode
Opening a file with vi enters general mode directly (this is the default mode). In this mode, you can use the 'arrow keys' to move the cursor, use 'delete character' or 'delete entire line' to handle file content, and use 'copy, paste' to process your file data.
Common syntax
| Syntax | Description |
|---|---|
| yy | Copy the current line where the cursor is |
| y数字y | Copy a block (from line X to line Y) |
| p | Move the arrow to the target line and paste |
| u | Undo the previous step |
| dd | Delete the current line where the cursor is |
| d数字d | Delete the specified number of lines after the cursor (inclusive) |
| x | Cut one letter, equivalent to del |
| X | Cut one letter, equivalent to Backspace |
| yw | Copy a word |
| dw | Delete a word |
| shift+6(^) | Move to the beginning of the line |
| shift+4 ($) | Move to the end of the line |
| 1+shift+g | Move to the top of the page, number |
| shift+g | Move to the bottom of the page |
| 数字+shift+g | Move to the target line |
2.2 Edit Mode
In general mode, you can perform actions like delete, copy, paste, but you cannot edit the file content! You must press any letter like 'i, I, o, O, a, A' to enter edit mode.
Note! Usually in Linux, when you press these keys, the text 'INSERT or REPLACE' will appear in the lower left corner of the screen, and only then can you edit. To return to general mode, you must press the 'Esc' key to exit edit mode.
1) Entering edit mode
| Key | Function |
|---|---|
| i | Before the current cursor |
| a | After the current cursor |
| o | Next line below the current cursor line |
| I | Beginning of the cursor's line |
| A | End of the cursor's line |
| O | Previous line above the current cursor line |
- Exiting edit mode
Press the 'Esc' key to exit edit mode, after which you will be in general mode.
2.3 Command Mode
In general mode, entering any of the 3 buttons ' : / ?' will move the cursor to the bottom line.
In this mode, you can perform 'search data' actions, and actions like reading, saving, bulk replacing characters, exiting vi, and displaying line numbers are accomplished in this mode!
- Basic syntax
| Command | Function |
|---|---|
| :w | Save |
| :q | Quit |
| :! | Force execution |
| /word to search | n searches next, N searches upward |
| :noh | Cancel highlight display |
| :set nu | Display line numbers |
| :set nonu | Disable line numbers |
| :%s/old/new/g | Replace content, /g replaces all matches |
- Practical exercise
(1) Force quit
:q!
2.4 Classroom Exercise
-
Create hello.java
-
Complete the instructor's in-class operations
3. Common File and Directory Commands
3.1. pwd Displays the absolute path of the current working directory
pwd: print working directory
- Basic syntax
pwd (Description: Displays the absolute path of the current working directory)
- Practical exercise
(1) Display the absolute path of the current working directory
[root@hadoop software]# pwd
/opt/software
ls Lists directory contents
ls: list
- Basic syntax
ls [Options] [Directory or File]
- Option description
| Option | Function |
|---|---|
| -a | List all files, including hidden files (files starting with .) (common) |
| -l | Display long format, including file attributes and permissions etc.; (common) equivalent to "ll" |
- Display description
The information listed in each row is: file type and permissions, number of links, file owner, file group, file size in bytes, creation or last modification time, name.
- Practical exercise
(1) View all content information of the current directory
[root@hadoop software]# ls -al
total 826140
drwxr-xr-x. 2 root root      4096 Aug  18 11:35 .
drwxr-xr-x. 6 root root      4096 Aug  18 11:31 ..
-rw-r--r--. 1 root root 312850286 Aug   6 15:33 apache-hive-3.1.2-bin.tar.gz
-rw-r--r--. 1 root root 338075860 Aug   4 17:09 hadoop-3.1.3.tar.gz
-rw-r--r--. 1 root root 195013152 Aug   4 17:28 jdk-8u212-linux-x64.tar.gz
-rw-r--r--. 1 root root      9224 Sep  12 2016 mysql57-community-release-el7-9.noarch.rpm
3.2 cd Switch Directory
cd: Change Directory
- Basic syntax
cd [Parameter]
- Parameter description
| Parameter | Function |
|---|---|
| cd absolute path | Switch path |
| cd relative path | Switch path |
| cd ~ or cd | Return to your home directory |
| cd - | Return to the previous directory |
| cd .. | Return to the parent directory of the current directory |
| cd -P | Jump to the actual physical path, not the shortcut path |
- Practical exercise
(1) Use absolute path to switch to the opt directory
[root@hadoop ~]# cd /opt/(2) Use relative path to switch to the software directory
[root@hadoop opt]# cd software/(3) Return to your home directory, which is /root
[root@hadoop software]# cd ~(4) cd- returns to the previous directory
[root@hadoop ~]# cd -
/opt/software
(5) Return to the parent directory of the current directory, meaning the parent of /opt/software;
[root@hadoop software]# cd ..3.3 mkdir Create a new directory
mkdir: Make directory
- Basic syntax
mkdir [Options] Directory-to-create
- Option description
| Option | Function |
|---|---|
| -p | Create multi-level directories |
- Practical exercise
(1) Create a directory
[root@hadoop ~]# mkdir bigdata03
[root@hadoop ~]# mkdir bigdata03/group1
(2) Create a multi-level directory
[root@hadoop ~]# mkdir -p bigdata04/group13.4 rmdir Delete an empty directory
rmdir: Remove directory
- Basic syntax
rmdir Empty-directory-to-delete
- Practical exercise
(1) Delete an empty folder
[root@hadoop ~]# rmdir bigdata03/group1/3.5 touch Create an empty file
- Basic syntax
touch File-name
- Practical exercise
[root@hadoop ~]# touch bigdata03/group1/zhangsan.txt3.6 cp Copy files or directories
- Basic syntax
cp [Options] source dest (Description: Copy source file to dest)
- Option description
| Option | Function |
|---|---|
| -r | Recursively copy the entire folder |
- Parameter description
| Parameter | Function |
|---|---|
| source | Source file |
| dest | Target file |
- Practical exercise
(1) Copy a file
[root@hadoop ~]# cp bigdata03/group1/zhangsan.txt bigdata04/group1/(2) Recursively copy the entire folder
cp -r bigdata03/group1/ bigdata04/3.7 rm Delete files or directories
- Basic syntax
rm [Options] deleteFile (Description: Recursively delete all content in the directory)
- Option description
| Option | Function |
|---|---|
| -r | Recursively delete all content in the directory |
| -f | Force deletion without prompting for confirmation. |
| -v | Show detailed execution process of the command |
- Practical exercise
(1) Delete content in the directory
[root@hadoop ~]# rm bigdata03/group1/zhangsan.txt(2) Recursively delete all content in the directory
[root@hadoop ~]# rm -rf bigdata03/3.8 mv Move files and directories or rename
- Basic syntax
(1) mv oldFile newFile
- Practical exercise
(1) Rename
[root@hadoop group1]# mv zhangsan.txt lisi.txt(2) Move a file
[root@hadoop group1]# mv lisi.txt ../group2/3.9 cat View file contents
View file contents, starting from the first line.
- Basic syntax
cat [Options] File-to-view
- Option description
| Option | Function |
|---|---|
| -n | Display line numbers for all lines, including empty lines. |
- Experience tips
Generally used for viewing relatively small files that fit on one screen.
- Practical exercise
(1) View file contents and display line numbers
[root@hadoop group1]# cat -n zhangsan.txt 3.10 tail Output the tail content of a file
tail is used to output the tail content of a file. By default, the tail command displays the last 10 lines of the file.
- Basic syntax
(1) tail file (Description: View the last 10 lines of the file)
(2) tail -n 5 file (Description: View the last 5 lines of the file, 5 can be any number of lines)
(3) tail -f file (Description: Track all updates to the document in real-time)
- Option description
| Option | Function |
|---|---|
| -n |
Output the last n lines of the file |
| -f | Display newly appended content of the file, monitor file changes |
- Practical exercise
(1) View the last 3 lines of the file
[root@hadoop group1]# tail -n 3 zhangsan.txt (2) Track all updates to the file in real-time
[root@hadoop group1]# tail -f zhangsan.txt 3.11 > Output redirection and >> Append
- Basic syntax
(1) ls -l > file (Description: Write the list content to file a.txt (overwrite))
(2) ls -al >> file (Description: Append the list content to the end of file aa.txt)
(3) cat file1 > file2 (Description: Overwrite file2 with the content of file1)
(4) echo "content" >> file
- Practical exercise
(1) Write the ls information to a file
[root@hadoop group1]# ls -al >lisi.txt(2) Append the ls information to a file
[root@hadoop group1]# ls -al >>lisi.txt(3) Use echo to append the word hello to a file
[root@hadoop group1]# echo hello >>lisi.txt3.12 history View previously executed commands
- Basic syntax
history (Description: View previously executed commands)
- Practical exercise
(1) View previously executed commands
[root@hadoop group1]# history 4. Common Compression and Decompression Commands
4.1 gzip/gunzip Compression
- Basic syntax
gzip file (Description: Compress a file, can only compress files to *.gz format)
gunzip file.gz (Description: Decompress a file)
- Experience tips
(1) Can only compress files, not directories
(2) Does not retain the original file
(3) Compressing multiple files simultaneously will produce multiple compressed packages
- Practical exercise
(1) gzip compression
[root@hadoop ~]#ll
test.java

[root@hadoop ~]# gzip test.java
[root@hadoop ~]#ll
test.java.gz
(2) gunzip decompression
[root@hadoop ~]# gunzip test.java.gz
[root@hadoop ~]# ls
test.java
4.2 zip/unzip Compression
- Basic syntax
zip [Options] XXX.zip Content-to-compress (Description: Command to compress files and directories)
unzip [Options] XXX.zip (Description: Command to decompress files)
- Option description
| zip option | Function |
|---|---|
| -r | Compress directory |
| unzip option | Function |
|---|---|
| -d |
Specify the directory to store decompressed files |
3) Experience tips
The zip compression command works on both Windows/Linux, can compress directories and retains the source files.
4) Practical exercise
(1) Compress test1.java and test2.java, the compressed name is test.zip
yum install zip unzip
[root@hadoop ~]# zip test.zip test1.java test2.java
  adding: test1.java (stored 0%)
  adding: test2.java (stored 0%)
[root@hadoop ~]# ll
test1.java
test2.java
test.zip
(2) Decompress test.zip
[root@hadoop ~]#unzip test.zip(3) Decompress test.zip to a specified directory -d
[root@hadoop ~]#unzip test.zip -d /opt4.3 tar Packaging
1) Basic syntax
tar [Options] XXX.tar.gz Content-to-package (Description: Package a directory, the compressed file format is .tar.gz)
2) Option description
| Option | Function |
|---|---|
| -c | Produce a .tar package file |
| -v | Show detailed information |
| -f | Specify the compressed file name |
| -z | Compress while packaging |
| -x | Unpack a .tar file |
| -C | Decompress to a specified directory |
- Practical exercise
(1) Compress multiple files
[root@hadoop ~]#tar -zcvf test.tar.gz test1.java test2.java
[root@hadoop ~]#ls
test1.java test2.java   test.tar.gz
(2) Compress a directory
[root@hadoop ~]# tar -zcvf bigdata03.tar.gz bigdata03/(3) Decompress to the current directory
[root@hadoop ~]# tar -zxvf test.tar.gz(4) Decompress to a specified directory
[root@hadoop ~]# tar -zxvf test.tar.gz -C /opt5. Linux File Types and Permissions
First, let's use the command ls -alh ~ to view detailed file information.
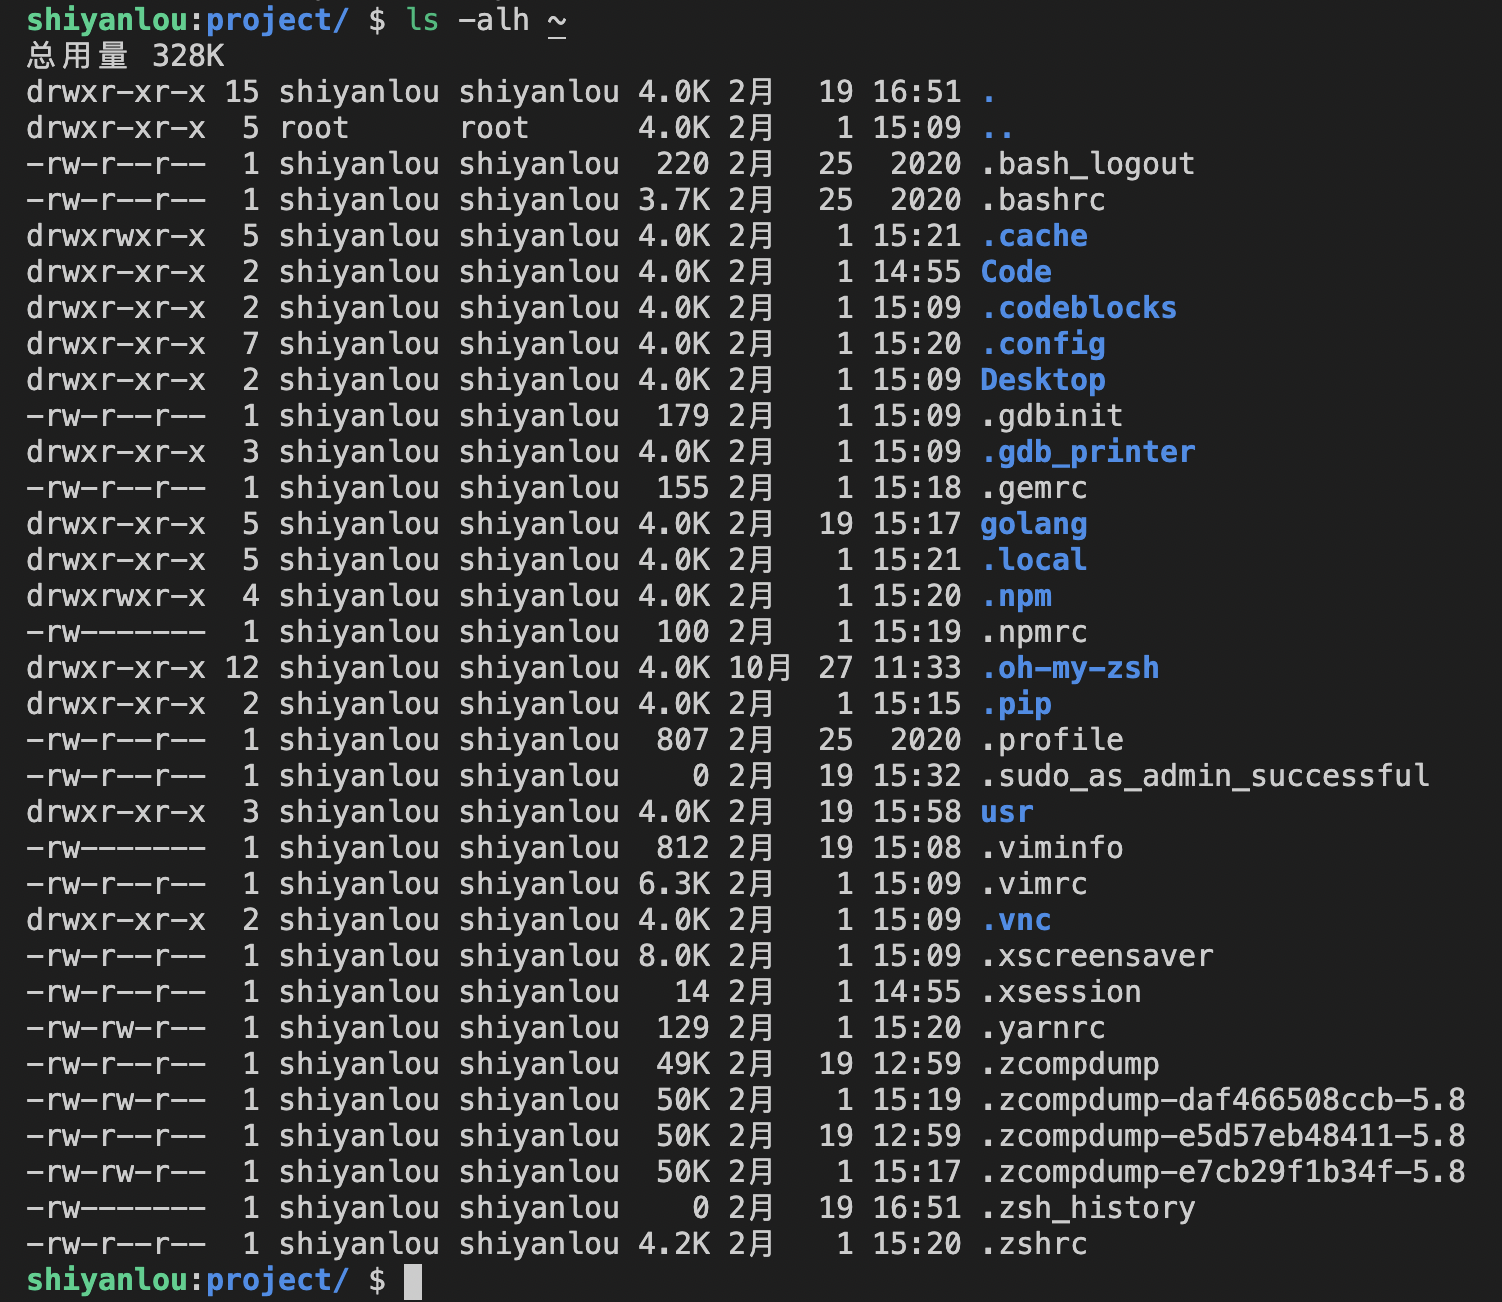
From the information printed on the screen, grouped by spaces, from left to right it represents:
File type and permissions, number of hard links, owner, owning group, file size, last modification time, file name.
Another important concept is that everything is a file in Linux. You may not understand this concept yet, but that's okay, just remember it.
5.1 File Types
The first character represents the file type. File types are mainly divided into the following 7 types. You only need to understand the first three; the later ones are not commonly used:
-
Regular file
-: Text files, data files, executable programs, etc., can all be stored as regular files. -
Directory
d: Directories reference other files by name. -
Symbolic link
l: Also called a soft link, points to a file by name.Character device file
c: Character device files allow the relevant driver to act as a buffer for input/output.Block device file
b: Block device files are used byI/Odrivers that handle block data, while allowing the kernel to provide buffering.Local domain socket
s: Connections that implement inter-process communication. Local domain sockets are created by the system callsocketand deleted withrmorunlink.Named pipe (FIFO)
p: Allows two processes running on the same host to communicate with each other. Similar tosocket, created withmknodand deleted withrm.
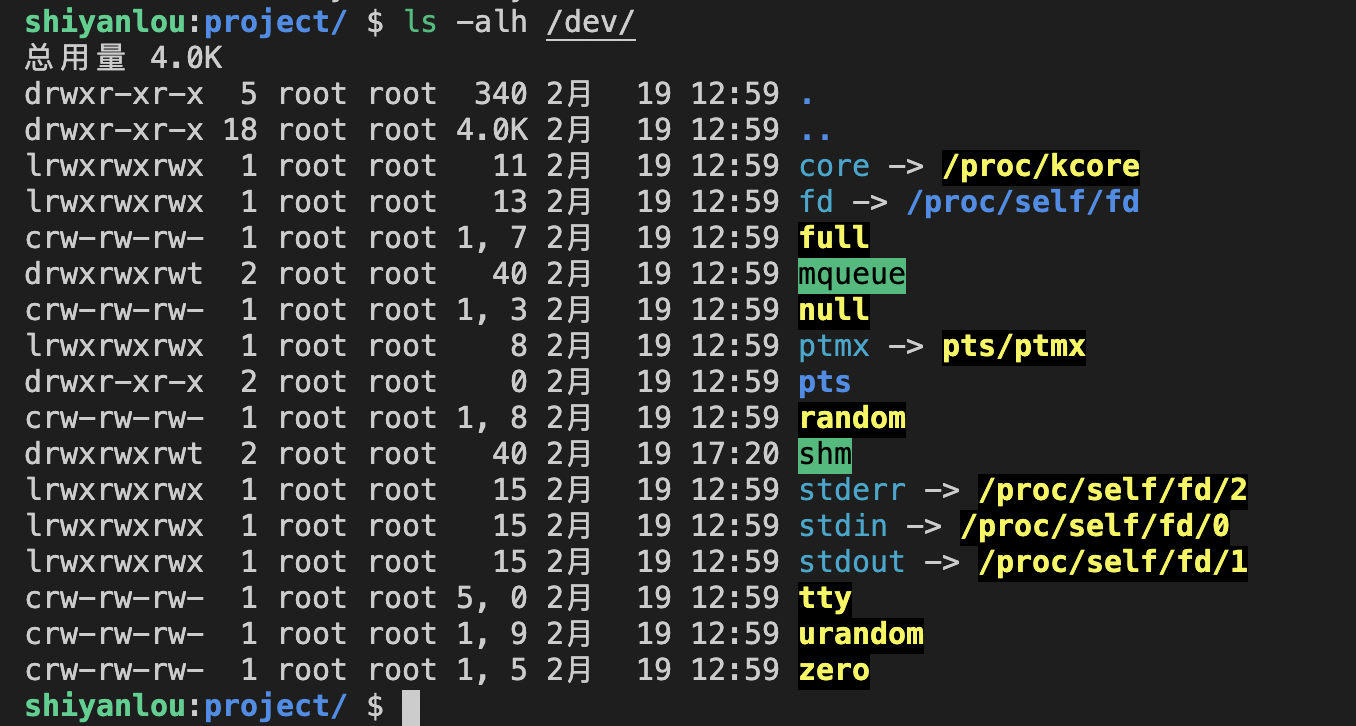
5.2 File Permissions
Apart from the file type, the following characters, grouped in threes, are all combinations of the three parameters rwx, representing Linux's read, write, execute permission controls. r stands for read, w stands for write, x stands for execute. Note that the positions of these three permissions do not change. If there is no permission, a minus sign - appears.
The three groups are owner permissions (U, i.e., user), group permissions (G, i.e., group), and other user permissions (O, i.e., other).
5.3 Permission Encoding
| Number | Character | File/Directory |
|---|---|---|
| 4 | r | View file contents / view file or directory names in a directory |
| 2 | w | Modify file contents / add, delete, modify in a directory |
| 1 | x | Execute programs or scripts / can use commands to switch directories |
| Octal | Binary | Permission |
|---|---|---|
| 0 | 000 | --- |
| 1 | 001 | --x |
| 2 | 010 | -w- |
| 3 | 011 | -wx |
| 4 | 100 | r-- |
| 5 | 101 | r-x |
| 6 | 110 | rw- |
| 7 | 111 | rwx |
5.3.1 chmod Change permissions
The chmod command is used to change the access permissions of files or directories in a Linux system. It controls the access permissions of files or directories. There are three ways to modify permissions with this command. One is setting in character form, one is text setting containing operator expressions, and another is numeric setting containing numbers.
1) Basic syntax
chmod +permissions+file or directory
2) Practical exercise
(1) Use character form to modify a file to have all read, write, and execute permissions
[root@hadoop ~]# chmod u=rwx,g=rwx,o=rwx test1.java(2) Use operator form to modify permissions: u has read, write, execute; g has read, write; o has read
[root@hadoop ~]# chmod u+rwx,g-x,o-wx test1.java(3) Use numbers to modify permissions
# Modify file permissions to `rwxrwxrwx`
chmod 777 install.log
# Modify file permissions to `rwx------`
chmod 700 install.log
# Modify file permissions to `rwxr-xr-x`
chmod 755 install.log
5.3.2 chown Change owner
The chown command is an abbreviation for change owner, mainly used to change the ownership of files or directories. Its syntax is similar to chmod. chown requires superuser root privileges to execute.
1) Basic syntax
chown [Options] [Final User] [File or Directory] (Description: Change the owner of a file or directory)
2) Option description
| Option | Function |
|---|---|
| -R | Recursive operation |
3) Practical exercise
(1) Modify the file owner
[root@hadoop ~]# chown lzh test1.java(2) Recursively change the file owner and owning group
[root@hadoop ~]# chown -R lzh:root bigdata03/5.3.3 chgrp Change the owning group
1) Basic syntax
chgrp [Final User Group] [File or Directory] (Description: Change the owning group of a file or directory)
2) Practical exercise
(1) Modify the owning group of a file
[root@hadoop ~]# chgrp -R lzh test1.java6. Linux User Management
6.1 useradd Add a new user
- Basic syntax
useradd Username (Description: Add a new user)
useradd -g Groupname Username (Description: Add a new user to a group)
- Practical exercise
(1) Add a user
[root@hadoop ~]# useradd lzh
[root@hadoop ~]# ll /home/
6.2 passwd Set user password
- Basic syntax
passwd Username (Description: Set user password)
- Practical exercise
(1) Set the user's password
[root@hadoop ~]# passwd 1234566.3 id Check if a user exists
- Basic syntax
id Username
- Practical exercise
(1) Check if the user exists
[root@hadoop ~]# id lzh6.4 su Switch user
su: switch user
- Basic syntax
su Username (Description: Switch user, only obtains the user's execution permissions, not environment variables)
su - Username (Description: Switch to the user and obtain the user's environment variables and execution permissions)
2) Practical exercise
(1) Switch user
[root@hadoop ~]# su lzh
[lzh@hadoop root]$ echo $PATH
/usr/local/sbin:/usr/local/bin:/usr/sbin:/usr/bin:/opt/jdk1.8.0_212/bin:/opt/hadoop-3.1.3/bin:/opt/hadoop-3.1.3/sbin:/root/bin:/opt/jdk1.8.0_212/bin:/opt/hadoop-3.1.3/bin:/opt/hadoop-3.1.3/sbin:/opt/jdk1.8.0_212/bin:/opt/hadoop-3.1.3/bin:/opt/hadoop-3.1.3/sbin:/opt/jdk1.8.0_212/bin:/opt/hadoop-3.1.3/bin:/opt/hadoop-3.1.3/sbin


[root@hadoop ~]# su - lzh
[lzh@hadoop root]$ echo $PATH
/usr/local/bin:/bin:/usr/bin:/usr/local/sbin:/usr/sbin:/opt/jdk1.8.0_212/bin:/opt/hadoop-3.1.3/bin:/opt/hadoop-3.1.3/sbin:/home/lzh/.local/bin:/home/lzh/bin
6.5 userdel Delete user
1) Basic syntax
(1) userdel Username (Description: Delete user but keep the user's home directory)
(2) userdel -r Username (Description: Delete both the user and the user's home directory)
- Option description
| Option | Function |
|---|---|
| -r | Delete the user and all files related to the user. |
3) Practical exercise
(1) Delete user but keep the user's home directory
[root@hadoop ~]#userdel lzh
[root@hadoop ~]#ll /home/
(2) Delete both the user and the user's home directory
[root@hadoop ~]#useradd zhangsan
[root@hadoop ~]#ll /home/
[root@hadoop ~]#userdel -r zhangsan
[root@hadoop ~]#ll /home/
6.6 who View logged-in user information
1) Basic syntax
(1) whoami (Description: Display the current user name)
(2) who am i (Description: Display the logged-in user's username and login time)
2) Practical exercise
(1) Display the current user name
[root@hadoop ~]# whoami(2) Display the logged-in user's username
[root@hadoop ~]# who am i6.7 usermod Modify user
1) Basic syntax
usermod -g UserGroup Username
2) Option description
| Option | Function |
|---|---|
| -g | Modify the user's initial login group. The given group must exist. The default group id is 1. |
3) Practical exercise
(1) Add the user to a user group
[root@hadoop ~]# usermod -g root lzh6.8 groupadd Add a group
1) Basic syntax
groupadd Groupname
2) Practical exercise
(1) Add a group1 group
[root@hadoop ~]# groupadd group16.9 groupdel Delete a group
1) Basic syntax
groupdel Groupname
2) Practical exercise
(1) Delete a group
[root@hadoop ~]# groupdel group16.10 groupmod Modify a group
1) Basic syntax
groupmod -n NewGroupname OldGroupname
1) Option description
| Option | Function |
|---|---|
| -n |
Specify the new name for the work group |
3) Practical exercise
(1) Modify the group name group2 to group3
[root@hadoop ~]# groupadd  group2
[root@hadoop ~]# groupmod -n  group3 group2
6.12 cat /etc/group View which groups have been created
- Basic operation
[root@hadoop ~]# cat /etc/group7. Linux File Search
7.1 find Search command
The find command recursively traverses subdirectories downward from the specified directory, displaying files that meet the conditions in the terminal.
1) Basic syntax
find [Search Range] [Options]
2) Option description
| Option | Function |
|---|---|
| -name |
Search for files by the specified file name pattern |
| -user |
Search for all files owned by the specified username |
| -size |
Search for files by the specified file size |
3) Case exercise
(1) By file name: Search for .txt files under /root by name.
[root@hadoop ~]# find /root -name "*.txt"(2) By owner: Search for files owned by the user root in the /root directory
[root@hadoop ~]# find /root -user root(3) By file size: Search for files larger than 20M in the / directory (+n greater than, -n less than, n equal to)
[root@hadoop ~]find / -size +20M7.2 grep Filter search and the "|" pipe symbol
The pipe symbol, "|", means passing the output of the previous command to the next command for processing.
1) Basic syntax
grep Options Search-content Source-file
2) Option description
| Option | Function |
|---|---|
| -n | Display matching lines and line numbers. |
3) Case exercise
(1) Find which line a file is on
[root@hadoop ~]# ls | grep -n xxx8. Linux Disk and Process Commands
8.1 df View disk space usage
df: disk free
1) Basic syntax
df Options (Description: List the overall disk usage of the file system, check the disk space usage of the file system)
2) Option description
| Option | Function |
|---|---|
| -h | Display in a human-readable format like GBytes, MBytes, KBytes; |
3) Case exercise
(1) View disk usage
[root@hadoop ~]# df -h8.2 ps View current system process status
ps: process status
1) Basic syntax
ps -aux | grep xxx (Description: View all processes in the system)
ps -ef | grep xxx (Description: View the relationship between parent and child processes)
2) Option description
| Option | Function |
|---|---|
| -a | Select all processes |
| -u | Display all processes of all users |
| -x | Display processes without a terminal |
3) Function description
(1) ps -aux display information description
USER: Which user created the process
PID: The ID number of the process
%CPU: The percentage of CPU resources occupied by the process. The higher the usage, the more resources the process consumes;
%MEM: The percentage of physical memory occupied by the process. The higher the usage, the more resources the process consumes;
VSZ: The size of virtual memory occupied by the process, in KB;
RSS: The size of actual physical memory occupied by the process, in KB;
TTY: Which terminal the process is running in. tty1-tty7 represent local console terminals, tty1-tty6 are local character interface terminals, tty7 is the graphical terminal. pts/0-255 represent virtual terminals.
STAT: Process status. Common statuses include: R: running, S: sleeping, T: stopped, s: contains child processes, +: in the background
START: The start time of the process
TIME: The CPU computation time occupied by the process, note this is not system time
COMMAND: The name of the command that produced this process
(2) ps -ef display information description
UID: User ID
PID: Process ID
PPID: Parent Process ID
C: The factor used by CPU to calculate execution priority. The larger the value, the more CPU-intensive the process is, and the execution priority will be lowered; the smaller the value, the more I/O-intensive the process is, and the execution priority will be raised.
STIME: Process start time
TTY: The full terminal name
TIME: CPU time
CMD: The command and parameters used to start the process
4) Experience tips
If you want to view the CPU usage and memory usage of a process, use aux;
If you want to view the parent process ID of a process, use ef;
8.3 kill Terminate a process
1) Basic syntax
kill [Options] Process-ID (Description: Kill a process by its process ID)
killall Process-Name (Description: Kill a process by its name, also supports wildcards, useful when the system is slow due to high load)
2) Option description
| Option | Function |
|---|---|
| -9 | Force the process to stop immediately |
3) Case exercise
(1) Force kill process 6666
[root@hadoop~]# kill -9 66669. Linux RPM
RPM is an abbreviation for Red-Hat Package Manager. Although this file format name carries the RedHat logo, it is originally open. Distributions including OpenLinux, S.u.S.E., and Turbo Linux all use it. It is similar to setup.exe in Windows and can be considered a recognized industry standard.
9.1 RPM query command (rpm -qa)
1) Basic syntax
rpm -qa (Description: Query all installed rpm packages)
2) Experience tips
Since there are many software packages, filtering is generally used. rpm -qa | grep rpm-package
3) Case exercise
(1) Query the installation status of xxx software
[root@hadoop~]# rpm -qa |grep xxx9.2 RPM uninstall command (rpm -e)
1) Basic syntax
(1) rpm -e RPM-package
(2) rpm -e --nodeps Package
2) Option description
| Option | Function |
|---|---|
| -e | Uninstall the software package |
| --nodeps | Do not check dependencies when uninstalling. In this |
Comments(0)