Linux Study Notes
Some study notes from when I was learning Linux.
Updated:
阅读中文版Linux Basics
1. Getting Started with Linux
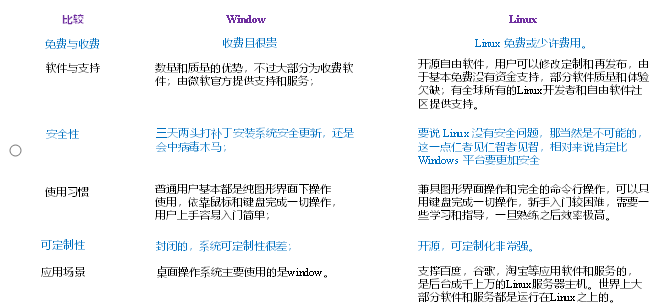
- A Simple Comparison Between Linux and Windows
2. Installing VMware Software
Just keep clicking "Next"...
3. Creating a New Virtual Machine
-- Similar to installing another virtual computer on your current machine.
4. Installing CentOS 7
-- Note: Before starting the virtual machine, make sure to mount the CentOS image file.
5. Common Linux Directory Structure
- bin Short for Binary, this directory stores the most frequently used commands.
- home Stores the home directories for regular users. In Linux, each user has their own directory, typically named after the user's account.
- root This is the super administrator's directory.
- tmp Stores temporary files.
- etc Contains all configuration files and subdirectories needed for system administration.
- boot Contains core files needed for Linux system startup, such as link files and image files. It's generally not recommended to place your own files here.
- usr Stores many user programs and files, similar to "Program Files" in Windows.
- var Typically stores files that change frequently, including log files.
6. Using the VI and VIM Editors
6.1, General Mode
Used for editing operations like copy, paste, delete...
| Syntax | Description |
|---|---|
| yy | Copy the current line |
| y数字y | Copy a block (from line X to line Y) |
| p | Move cursor to target line and paste |
| u | Undo the last action |
| dd | Delete the current line |
| d数字d | Delete the specified number of lines after (and including) the cursor |
| x | Cut one character, equivalent to Del |
| X | Cut one character, equivalent to Backspace |
| yw | Copy a word |
| dw | Delete a word |
| shift+6(^) | Move to the beginning of the line |
| shift+4 ($) | Move to the end of the line |
| 1+shift+g | Move to the top of the file, number |
| shift+g | Move to the bottom of the file |
| 数字+shift+g | Move to a specific line |
6.2, Edit Mode
Allows direct text editing and insertion.
6.3, Command Mode
Use commands to perform global text operations like save, quit, search, replace.
| Command | Function |
|---|---|
| :w | Save |
| :q | Quit |
| :! | Force execution |
| /search_term | n searches next, N searches previous |
| :noh | Cancel highlight display |
| :set nu | Show line numbers |
| :set nonu | Hide line numbers |
| :%s/old/new/g | Replace content, /g replaces all matches |
6.4, Switching Between Modes
The default mode when opening a file is General Mode. General Mode to Edit Mode --> press i Edit Mode to General Mode --> press esc General Mode to Command Mode --> press : or / (use / for search scenarios)
7. Network Configuration and System Management Operations
7.1, The Connection Between Physical and Virtual Machine Network Configurations
1). When installing VMware, a virtual network adapter is installed by default to ensure communication between the physical machine and the VMware software. This virtual adapter gets an IP: 192.168.X.1
2). Checking the VMware Virtual Network Editor shows that the software also occupies an IP: 192.168.X.0
3). When we create a new guest machine and install Linux on it, a network configuration assigns an IP: 192.168.X.X to the guest machine (Linux). This ensures normal communication between the physical machine, VMware, and the Linux guest.
4). Usually, we need to manually change the Linux guest's IP to static, to prevent it from being dynamically reassigned after each reboot.
-- Modify the ifcfg-ens33 file
vim /etc/sysconfig/network-scripts/ifcfg-ens33 Modify the content as follows:
BOOTPROTO="static"
ONBOOT="yes"
#IP Address
IPADDR=192.168.2.100
#Gateway (virtual machine's gateway, may differ on each computer)
GATEWAY=192.168.2.2
#Domain Name Resolver
DNS1=192.168.2.2
7.2, Configuring the Hostname
Modify the hostname
[lzh@lzhgy100 home]$ vim /etc/hostname
Modify the hosts mapping file
[root@lzhgy100 ~]# vim /etc/hosts
Add the following content
192.168.25.100  lzhgy100
192.168.25.101  lzhgy101
192.168.25.102  lzhgy102
192.168.25.103  lzhgy103
192.168.25.104  lzhgy104
Modify the host mapping file (hosts file) on Windows 10
(1) Navigate to the path C:\Windows\System32\drivers\etc
(2) Copy the hosts file to the desktop
(3) Open the desktop hosts file and add the following content
192.168.25.100  lzhgy100
192.168.25.101  lzhgy101
192.168.25.102  lzhgy102
192.168.25.103  lzhgy103
192.168.25.104  lzhgy104
7.3, Disabling the Firewall
-
Basic Syntax
systemctl start | stop | restart | status service-name
-
Tips and Tricks Method to view services: /usr/lib/systemd/system
-
Practical Examples (1) Check the status of the firewall service
[root@lzhgy100 ~]# systemctl status firewalld.service (2) Stop the firewall service
[root@lzhgy100 ~]# systemctl stop firewalld.service (3) Start the firewall service
[root@lzhgy100 ~]# systemctl start firewalld(4) Restart the firewall service
[root@lzhgy100 ~]# systemctl restart firewalld.service(5) Enable/Disable the automatic startup of the iptables (firewall) service
[root@lzhgy100 ~]#systemctl enable firewalld.service
[root@lzhgy100 ~]#systemctl disenable firewalld.service
8. Common Commands
8.1 Help Commands
man
- Basic Syntax man [command or configuration file] (Description: Get help information)
[root@lzhgy100 ~]# man lshelp
- Basic Syntax help command (Description: Get help information for shell built-in commands)
[root@lzhgy100 ~]# help cdCommon Shortcuts
| Common Shortcut | Function |
|---|---|
| ctrl + c | Stop the process |
| ctrl+l | Clear screen; full clear is: reset |
| ctrl + q | Quit |
| Use tab key | Autocomplete (more importantly, prevents typos) |
| Up/Down arrows | Search through command history |
| ctrl +alt | Switch between Linux and Windows |
8.2, File and Directory Commands
-
pwd - Display the absolute path of the current working directory
[root@lzhgy100 bbb]# pwd
/root/bbb-
ll - List directory contents
ll=ls -l
[root@lzhgy100 /]# ll-
cd - Change directory
cd: Change Directory
- Basic Syntax cd [parameter]
- Parameter Description
| Parameter | Function |
|---|---|
| cd absolute path | Change to that path |
| cd relative path | Change to that path |
| cd ~ or cd | Go back to your home directory |
| cd - | Go back to the previous directory |
| cd .. | Go up one directory level |
| cd -P | Jump to the actual physical path, not the shortcut path |
-
mkdir - Create a new directory
[root@lzhgy100 ~]# mkdir abc-
rmdir - Delete an empty directory
[root@lzhgy100 ~]# rmdir abc-
touch - Create an empty file
[root@lzhgy100 ~]# touch ccc-
cp - Copy files or directories
[root@lzhgy100 ~]# cp aaa -r abc/
[root@lzhgy100 ~]# cp bb.txt abc/-
rm - Delete files or directories
[root@lzhgy100 ~]# rm bb.txt
[root@lzhgy100 ~]# rm -rf abc-
mv - Move files/directories or rename
[root@lzhgy100 ~]# mv aa.sh aaa/
[root@lzhgy100 ~]# mv aa.tex aa.txt-
cat - View file contents
[lzh@lzhgy100 home]$ cat aa.sh-
more - View file contents page by page
[root@lzhgy100 ~]# more bb.txt-
less - View file contents page by page (similar to more)
[root@lzhgy100 ~]# less bb.txt-
echo
[root@lzhgy100 ~]# echo -e "aaa\tbbb"-
head - Display the beginning of a file
[root@lzhgy100 ~]# head -n 1 bb.txt-
tail - Display the end of a file
[root@lzhgy100 ~]# tail -f bb.txt-
> Output redirection and >> Append
[root@lzhgy100 ~]# echo "aaa哈哈哈">>bb.txt-
ln - Symbolic link (soft link)
[root@lzhgy100 ~]# ln -s bb.txt ln_bbb
##To delete a soft link: rm -rf soft_link_name, not rm -rf soft_link_name/-
history - View previously executed commands
[root@lzhgy100 ~]# history 8.3, Date and Time Commands
-
date - Display the current time
(1) Display current time information
[root@lzhgy100 ~]# date
Fri Mar 12 18:33:55 CST 2021
(2) Display current year, month, day
[root@lzhgy100 ~]# date +%Y-%m-%d
2021-03-12
(3) Display current year, month, day, hour, minute, second
[root@lzhgy100 ~]# date "+%Y-%m-%d %H:%M:%S"
2021-03-12 18:36:01-
date - Display non-current time
(1) Display yesterday's date
[root@lzhgy100 ~]# date -d '1 days ago'
Thu Mar 11 18:37:05 CST 2021
(2) Display tomorrow's date
[root@lzhgy100 ~]# date -d '-1 days ago'
Sat Mar 13 18:37:45 CST 2021-
date - Set the system time
[root@lzhgy100 ~]# date -s "2021-06-19 20:52:18"
Sat Jun 19 20:52:18 CST 2021-
cal - View the calendar
[root@lzhgy100 ~]# cal 20218.4, User Management Commands
-
useradd - Add a new user
[root@lzhgy100 ~]# useradd gy -
passwd - Set user password
[root@lzhgy100 ~]# passwd gy -
id - Check if a user exists
[root@lzhgy100 ~]# id gy uid=1001(gy) gid=1001(gy) groups=1001(gy) -
cat /etc/passwd - View which users have been created
[root@lzhgy100 ~]# cat /etc/passwd -
su - Switch user
[root@lzhgy100 ~]# su gy -
userdel - Delete a user
[root@lzhgy100 ~]# userdel gy -
who - View logged-in user information
##Display your own username [root@lzhgy100 ~]# whoami ##Display the username of the logged-in user [root@lzhgy100 ~]# who am i -
sudo - Grant root privileges to a regular user
[root@lzhgy100 ~]#vi /etc/sudoers ## Allow root to run any commands anywhere root ALL=(ALL) ALL lzh ALL=(ALL) NOPASSWD:ALL -
usermod - Modify a user
usermod -g user_group username
[root@lzhgy100 ~]# usermod -g root lzh
8.5, User Group Management Commands
-
groupadd - Add a new group
[root@lzhgy100 ~]# groupadd gr1 -
groupdel - Delete a group
[root@lzhgy100 ~]# groupdel gr1 -
groupmod - Modify a group
groupmod -n new_group_name old_group_name [root@lzhgy100 ~]# groupmod -n lzh100 lzh -
cat /etc/group - View which groups have been created
[root@lzhgy100 ~]# cat /etc/group
8.6, File Permission Commands
-
File Attributes
Represented by the 10 characters from left to right
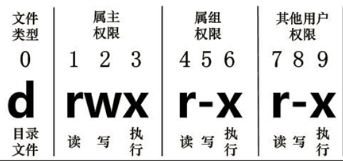
If there is no permission, a minus sign [ - ] appears. From left to right, use numbers 0-9 to represent them:
(1) The 0th character indicates the type
In Linux, the first character represents whether the file is a directory, file, link file, etc.
- represents a regular file
d represents a directory
l represents a link file
(2) Characters 1-3 determine the permissions of the owner (the file's owner). ---User
(3) Characters 4-6 determine the permissions of the group (users in the same group as the owner). ---Group
(4) Characters 7-9 determine the permissions of other users. ---Other
The different interpretations of rwx when applied to files and directories
- Applied to files: [ r ] stands for read: can read and view [ w ] stands for write: can modify, but does not mean the file can be deleted. A prerequisite for deleting a file is having write permission on the directory containing the file. [ x ] stands for execute: can be executed by the system (2) Applied to directories: [ r ] stands for read: can read, use ls to view directory contents [ w ] stands for write: can modify, create + delete + rename within the directory [ x ] stands for execute: can enter the directory
-
chmod - Change permissions
First method to change permissions
chmod [{ugoa}{+-=}{rwx}] file_or_directory
Second method to change permissions
chmod [mode=421 ] [file_or_directory]
Tips and Tricks
u: owner g: group o: others a: all users (sum of u, g, o)
r=4 w=2 x=1 rwx=4+2+1=7
##Give the group execute permission on the file [root@lzhgy100 ~]# chmod g+x bb.txt ##Use numeric mode to give the owner, group, and others read, write, and execute permissions. [root@lzhgy100 ~]# chmod 777 bb.txt ##Change permissions for all files within a folder so the owner, group, and others have read, write, and execute permissions. [root@lzhgy100 ~]# chmod 777 aaa/ -
chown - Change the owner
chown [options] [new_owner] [file_or_directory] (Description: Change the owner of a file or directory)
## Change the file owner [root@lzhgy100 ~]# chown lzh aaa ## Recursively change the owner and group of all files [root@lzhgy100 ~]# chown -R lzh:lzh aaa/ -
chgrp - Change the group
[root@lzhgy100 aaa]# chgrp root aa.sh
8.7, Search and Locate Commands
-
find - Find files or directories
The find command recursively traverses subdirectories from the specified directory and displays files meeting the criteria in the terminal.
- Basic Syntax
find [search_range] [options]
- Option Description
Table 7-21
Option Function -name Find files matching the specified filename pattern -user Find files owned by the specified username -size<file_size> Find files by specified size. Units are: *b* – block (512 bytes)*c* – bytes****w**** – word (2 bytes)*k* – kilobytes****M**** – megabytes****G**** – gigabytes - Practical Examples
(1) By filename: Find the file filename.txt in the / directory by name.
[root@lzhgy100 ~]# find bbb/ -name *.sh
(2) By owner: Find files in the /opt directory owned by the user -user
[root@lzhgy100 ~]# find /opt -user lzh
(3) By file size: Find files larger than 200m in the /home directory (+n greater than, -n less than, n equal to)
[root@lzhgy100 ~]find /home -size +204800
-
locate - Quickly locate file paths
The locate command uses a pre-built database of all system file names and paths to quickly locate a given file. It doesn't need to traverse the entire file system, making it faster. To ensure accuracy, administrators must periodically update the locate database. Files under /tmp will not be found.
-
Basic Syntax locate search_file
-
Tips and Tricks Since locate queries a database, you must run the updatedb command to create the locate database before the first use.
-
Practical Examples
[root@lzhgy100 ~]# locate lzh.sh -
-
grep - Filter search and the "|" pipe symbol
The pipe symbol, "|", passes the output of the preceding command to the following command for processing.
- Basic Syntax
-n Displays the matching line and its line number.
grep options search_content source_file
[root@lzhgy100 ~]# ls |grep -n a
2:aaa.txt
3:aa.txt
4:anaconda-ks.cfg
7:initial-setup-ks.cfg
8:ln_a
9:ln_aa
8.8, Compression and Archiving Commands
-
gzip/gunzip - Compression
- Basic Syntax
gzip file (Description: Compress a file, can only compress files to *.gz format)
gunzip file.gz (Description: Decompress a file)
- Tips and Tricks
(1) Can only compress files, not directories
(2) Does not keep the original file
- Practical Examples
[root@lzhgy100 ~]# gzip aaa.txt aa.tx [root@lzhgy100 ~]# gunzip aaa.txt.gz aa.txt.gz -
zip/unzip - Compression
- Basic Syntax
-r compress directory -d
specify the directory to extract files to zip [options] XXX.zip content_to_compress (Description: Command to compress files and directories)
unzip [options] XXX.zip (Description: Command to decompress files)
##Compress a file to a specified directory [root@lzhgy100 ~]# zip gy/aa.zip aa.txt ##Compress a directory [root@lzhgy100 ~]# zip lzh/lzh.zip -r gy ##Extract a file to a specified directory [root@lzhgy100 ~]# unzip aa.zip -d lzh -
tar - Archiving
- Basic Syntax
tar [options] XXX.tar.gz content_to_archive (Description: Archive a directory, compressed file format is .tar.gz)
- Option Description
Option Function -c Create a .tar archive file -v Show detailed information -f Specify the compressed filename -z Compress while archiving -x Extract a .tar file -C Extract to a specified directory - Practical Examples
##Archive and compress aa.txt and the lzh folder
[root@lzhgy100 ~]# tar -cvzf lzh.tar.gz aa.txt lzh
##Extract to a specified directory
[root@lzhgy100 ~]# tar zxvf lzh.tar.gz -C gy/
8.9, Disk Partition Commands
- df - View disk space usage
- fdisk - View partitions
- lsblk - View device mount status
- mount/umount - Mount/Unmount
8.10, Process and Thread Commands
-
ps - View current system process status
ps: process status
- Basic Syntax
ps -aux | grep xxx (Description: View all processes in the system)
ps -ef | grep xxx (Description: View the relationship between parent and child processes)
- Option Description
Table 7-30
Option Function -a Select all processes -u Display all processes for all users -x Display processes without a terminal - Field Descriptions
(1) ps -aux display information description
USER: Which user created the process
PID: The process ID
%CPU: Percentage of CPU resources used by the process. Higher means more resource-intensive.
%MEM: Percentage of physical memory used by the process. Higher means more resource-intensive.
VSZ: Virtual memory size used by the process, in KB.
RSS: Actual physical memory size used by the process, in KB.
TTY: Which terminal the process is running in. tty1-tty7 represent local console terminals, tty1-tty6 are local character interface terminals, tty7 is the graphical terminal. pts/0-255 represent virtual terminals.
STAT: Process state. Common states: R: Running, S: Sleeping, T: Stopped, s: Contains child processes, +: In the background
START: The start time of the process
TIME: The CPU time used by the process, note this is not system time
COMMAND: The command name that generated this process
(2) ps -ef display information description
UID: User ID
PID: Process ID
PPID: Parent Process ID
C: Factor used by CPU for calculating execution priority. A larger value indicates a CPU-intensive process, lowering its execution priority; a smaller value indicates an I/O-intensive process, raising its execution priority.
STIME: Process start time
TTY: Full terminal name
TIME: CPU time
CMD: The command and arguments used to start the process
- Tips and Tricks
Use aux to view CPU and memory usage of processes.
Use ef to view the parent process ID of a process.
-
kill - Terminate a process
kill [options] process_id (Description: Kill a process by its ID)
killall process_name (Description: Kill processes by name, supports wildcards, useful when the system is slow due to high load)
-9 forces the process to stop immediately.
-
pstree - View the process tree
pstree [options]
-p Display the PID of processes
-u Display the user owning the processes
-
top - View system health status
- Basic Command
top [options]
- Option Description
Option Function -d seconds Specifies how often the top command updates. Default is 3 seconds. Commands that can be executed in top's interactive mode: -i Makes top not display any idle or zombie processes. -p Monitor only the status of a specific process by specifying its ID. - Operation Description
Operation Function P Sort by CPU usage, this is the default M Sort by memory usage N Sort by PID q Quit top -
netstat - Display network statistics and port usage
-
Basic Syntax
netstat -anp | grep process_id (Description: View network information for this process)
netstat –nlp | grep port_number (Description: View network port usage)
- Option Description
Table 7-40
Option Function -n Refuse to show aliases, convert all displayable numbers to numbers -l Only list services in the listen (listening) state -p Show which process is using the port - Practical Examples
View the network information of a process by its ID
[root@lzhgy100 ~]# netstat -anp | grep sshd
Check if a specific port is occupied
[root@lzhgy100 ~]# netstat -nlp |grep 22
-
8.11 crontab - System Scheduled Tasks
-
crontab - Service Management
Restart the crond service
[root@lzhgy100 ~]# systemctl restart crond
-
crontab - Scheduled Task Settings
- Basic Syntax
crontab [options]
- Option Description
Option Function -e Edit the crontab scheduled tasks -l Query crontab tasks -r Delete all crontab tasks for the current user - Parameter Description
[root@lzhgy100 ~]# crontab -e
(1) Enters the crontab editing interface. It will open vim to edit your tasks.
Task components
Field Meaning Range First "*" Minute of the hour 0-59 Second "*" Hour of the day 0-23 Third "*" Day of the month 1-31 Fourth "*" Month of the year 1-12 Fifth "*" Day of the week 0-7 (0 and 7 both represent Sunday) (2) Special Symbols
Special Symbol Meaning * Represents any time. For example, the first "*" means the command runs every minute of the hour. , Represents non-continuous times. For example, "0 8,12,16 * * * command" means the command runs at 8:00, 12:00, and 16:00 every day. - Represents a continuous time range. For example, "0 5 * * 1-6 command" means the command runs at 5:00 AM from Monday to Saturday. */n Represents running every n units. For example, "*/10 * * * * command" means the command runs every 10 minutes. (3) Executing commands at specific times
Time Meaning 45 22 * * * command Run the command at 22:45 0 17 * * 1 command Run the command at 17:00 every Monday 0 5 1,15 * * command Run the command at 5:00 AM on the 1st and 15th of every month 40 4 * * 1-5 command Run the command at 4:40 AM from Monday to Friday */10 4 * * * command Run the command every 10 minutes starting at 4:00 AM daily 0 0 1,15 * 1 command Run the command at 0:00 on the 1st and 15th of every month, and every Monday. Note: It's best not to specify both the day of the week and the day of the month, as they both define days. This can easily confuse administrators. - Practical Examples
(1) Add the number 11 to the file /root/bailongma.txt every 1 minute
*/1 * * * * /bin/echo ”11” >> /root/bailongma.txt
9. Software Package Management
9.1, RPM
- Basic Syntax
rpm -qa (Description: Query all installed rpm packages)
rpm -e RPM_package_name (Description: Uninstall a package)
rpm -ivh RPM_package_full_name (Description: Install a package)
| Option | Function |
|---|---|
| -i | -i=install, install |
| -v | -v=verbose, show detailed info |
| -h | -h=hash, progress bar |
| --nodeps | --nodeps, do not check dependencies |
- Tips and Tricks*
Since there are many packages, filtering is common. rpm -qa | grep package_name
9.2, yum
-
Basic Syntax
yum [options] [parameters]
-
Option Description
| Option | Function |
|---|---|
| -y | Answer "yes" to all questions |
- Parameter Description
| Parameter | Function |
|---|---|
| install | Install rpm packages |
| update | Update rpm packages |
| check-update | Check for available rpm updates |
| remove | Remove specified rpm packages |
| list | Display package information |
| clean | Clean up expired yum cache |
| deplist | Display all dependencies of yum packages |
-
Practical Examples
(1) Install firefox using yum
[root@lzhgy100 ~]# yum -y install firefox

Comments(0)